Deploy Your Application with a Click
September 15, 2020
Today, almost all web-based applications require a server to provide service. Web developers usually build their applications, then upload them on to their servers. While it sounds really simple, but sometime it could be cumbersome.
Imaging that now you need to release a frontend application, and your girlfriend is mad at you for being late. Yet you need to get your work done.
So you start building the bundle on your local machine, which could take minutes or even half an hour depends on the scale and the dependencies you introduced. After that, you need to upload those files on to the server in order to replace the old version. This step is a bit faster, but you still need to connect through SSH, then carefully copy the release build to the correct directory. At last, in some cases, you might need to restart the load balancer.
Finally you did it, but then you see your girlfriend, who has been waiting for over half an hour, oops~
Problems of Manual Deployment
- Time consuming. You need to get everything ready on your local machine before you uploading.
- Procedure remains non-standardized. Even though you're following those steps that you may have taken hundreds of time. You can still miss out something. Only because you're human, and human makes mistakes.
- Repetitive work. In the previous example, we are only dealing with ONE server. This won't happen in real business where normally you have more than one and the number could reach thousands or even more. That would be impossible to do deployment by hands.
You can deploy your apps manually anyway. But one has said:
As a software engineer, any task that can be done with coding, should be done with coding.
I can't agree more about that. So in this post we're going to find out how can we deploy our applications automatically.
1. Continuous Deployment
Before we start, let's look at a few concepts.
We always hear about CI/CD in DevOps. While CI stands for Continuous Integration, CD can either stands for Continuous Delivery or Continuous Deployment. Although the two CDs are very similar, there is difference between them.
Continuous delivery is a software development practice where code changes are automatically prepared for a release to production. With continuous delivery, every code change is built, tested, and then pushed to a non-production testing or staging environment. There can be multiple, parallel test stages before a production deployment.
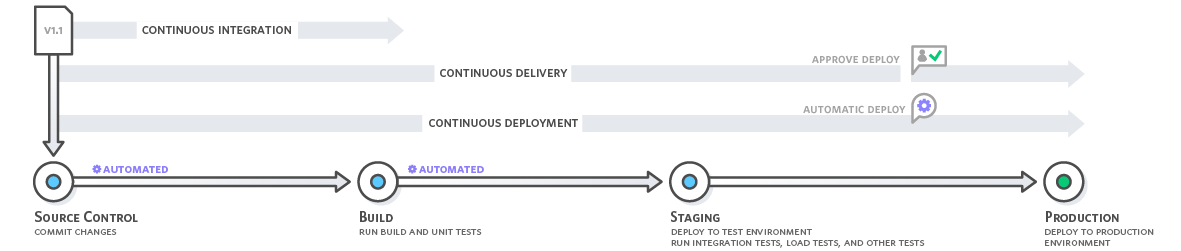
The difference between continuous delivery and continuous deployment is the presence of a manual approval to update to production. With continuous deployment, production happens automatically without explicit approval.
Find out more details on CD here.
Since Continuous Delivery is a process covered by Continuous Deployment, we will discuss only the second one here.
2. The "Click"
Now we already now know about Continuous Deployment. But as our title says "Deploy Application with a Click", the question is which "Click"? You definitely don't want your application being deployed after every single mouse click. So what we're talking about is the timing. At which moment should we trigger the deployment?
Whenever you want to deploy your applications, there usually will be something different between what you have on the server before the deployment and what you have after. Otherwise the deployment is unnecessary. So what we are looking for is changes, changes that happen to your codebase, because in most cases, changes of production can be track back to changes of code.
Now the answer is obvious. Since most of us use Source Control Tools in our projects to manage the code, and I strongly recommend it if you are not, the correct moment we need would be the moment when the remote server's code has been modified, which means the moment you push your code to remote if you are using Git, or the moment you commit your code if you are using SVN. (We will only discuss the case using Git in this post.)
3. Webhook
Ok so now we know what (automatical deployment) we want to do and when (codebase changes) we want to do it. But how?
To answer this question I will introduce you Webhook :
A webhook in web development is a method of augmenting or altering the behavior of a web page or web application with custom callbacks.
I prefer this one though:
Webhooks are "user-defined HTTP callbacks". They are usually triggered by some event, such as pushing code to a repository or a comment being posted to a blog. When that event occurs, the source site makes an HTTP request to the URL configured for the webhook. Users can configure them to cause events on one site to invoke behavior on another.
Basically, what webhook does is posting a request with specific payloads that explain the event triggers it. With webhook, we are able to notify our server that the codebase has been modified and a deployment should be triggered, once a push or a commit has performed.
Time to roll up your sleeves!
In order to implement what we've discussed so far. We need the following things prepared:
- A GitHub repository;
- A HTTP server;
- An IP address;
Firstly, we run the HTTP server that provide service at the IP we have. Here I will use a Node server as example:
const express = require('express');
const app = express();

app.use(
  express.urlencoded({
    extended: true,
  })
);
app.use(express.json());

app.post('/', (req, res) => {
  console.log(req.body.repository);
  // here "repository" is one of the fields
  // in the payloads from GitHub's webhook.
});

app.listen(8000, () => {
  console.log('Express Ready.');
});
This is a super simple Express server which is listening a POST request at route / on port 8000. Make sure the server is running, then proceed.
We are going to configure our webhook on GitHub now.
Open the repository that we will eventually deploy on the server, then go to Setting -> Webhook -> Add webhook. Here we'll see a Payload URL is required. Use the IP address, port, route that we set up before, then select application/json for the Content Type, which specifies the content type of the request that will be sent to our server later.
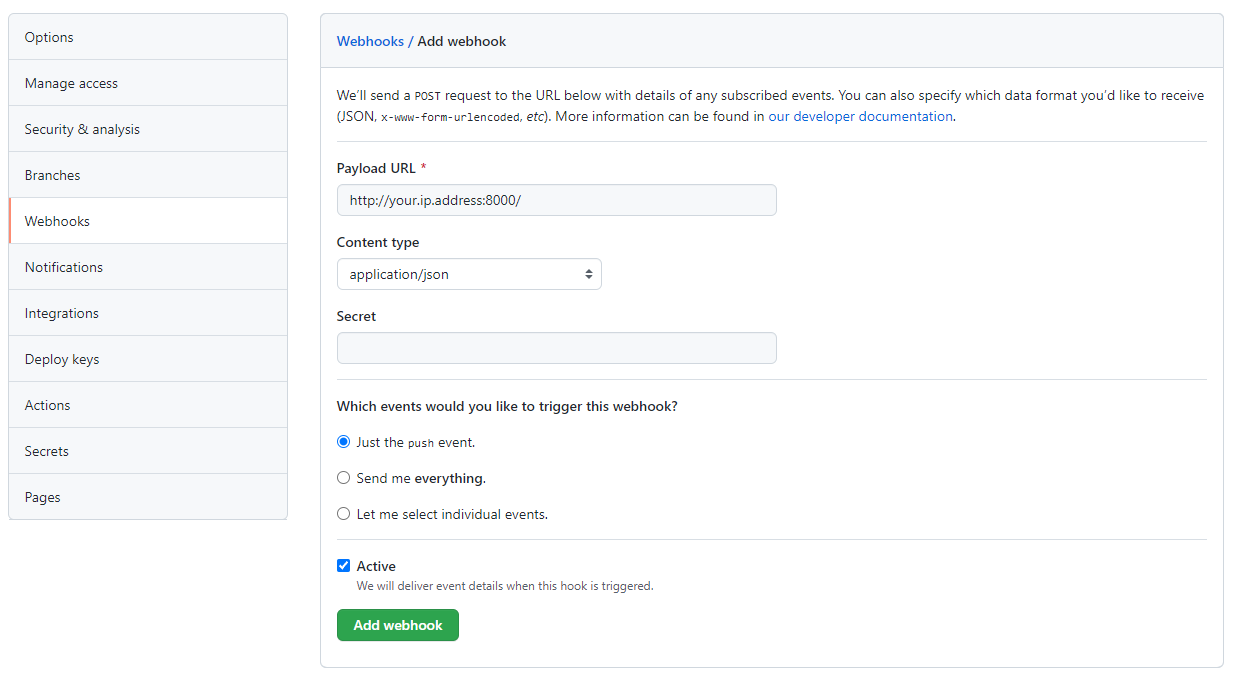
Click "Add webhook" button, a Ping event will be fired to test whether this webhook works or not, and each time when there's a PUSH event, the same request will be sent out.
Go back to our server where we can see logs should be like this:
 "repository": {
    "id": 43211234,
    ......
    "name": "your-repository-name",
    "full_name": "your-github-username/your-repository-name",
    "private": true,
    "owner": {
      "login": "your-github-username",
      "id": 12344321,
      "url": "https://api.github.com/users/your-github-username",
      ......
    },
Find out more details about Github's webhook events and payloads here.
Deploying the application
Now our server is notified of the push event. The next step would be actually deploying the application. In most cases we will use Docker to deploy an application, however we can not cover it today, because that would be too much to discussed, but we will talk about Docker in the future posts for sure.
Instead, we're going to use a normal way to deploy our application.
Assuming that we are going to deploy a React project, which will be hosted under the /website directory of our server.
The first thing we are going to do when we receive the request from the webhook, is to clone the repository from GitHub to the server (note that in order to do this, you need to add a SSH key to your GitHub account):
const express = require('express');
const app = express();
const { execSync } = require('child_process');
const { path } = require('path');
const fs = require('fs');

// some code here...

app.post('/', (req, res) => {
  try {
    const tempWorkspace = path.join('/website', 'temp');
    if (fs.existsSync(tempWorkspace)) {
      fs.rmdirSync(tempWorkspace, { recursive: true });
    }
    fs.mkdirSync(tempWorkspace);

    const {
      name: repoName,
      owner: { login: gitAccount },
    } = req.body.repository;

    execSync(`git clone git@github.com:${gitAccount}/${repoName}.git ${tempWorkspace}`);
  } catch (err) {
    console.log(err);
  }
});

// some code here...
In order to keep it tidy, we create a temporary workspace for the deployment process. All the intermediate steps should be done inside the workspace.
Once we're done cloning the codebase, we need to install all the dependencies and then build the production (note that you will need a Node environment as well as NPM on your server for such project):
const express = require('express');
const app = express();
const { execSync } = require('child_process');
const { path } = require('path');
const fs = require('fs');

app.post('/', (req, res) => {
  try {
    const tempWorkspace = path.join('/website', 'temp');

    // some code here...

    execSync(`git clone git@github.com:${gitAccount}/${repoName}.git ${tempWorkspace}`);
    process.chdir(tempWorkspace);
    execSync(`npm install`);
    execSync(`npm run build`);
  } catch (err) {
    console.log(err);
  }
});
Now we have the production build, everything we need is inside that folder. The last thing we need to do is replacing the existing version with the new one:
const express = require('express');
const app = express();
const { execSync } = require('child_process');
const { path } = require('path');
const fs = require('fs');

app.post('/', (req, res) => {
  try {
    const tempWorkspace = path.join('/website', 'temp');

    // some code here...

    const serveDir = '/website'
    const buildDir = path.resolve(tempWorkspace, 'build');
    // The output dir of the project is specified to '/build'.

    execSync(`cp -r ${buildDir}/* ${serverDir}`);
    // Copy all files in buildDir to serveDir.

    fs.rmdirSync(tempWorkspace, { recursive: true });
    // Remove the temporary workspace.

  } catch (err) {
    console.log(err);
  }
});
Here we use shell command to copy the files instead of using the fs module. By now, the new version of our application has been already deployed. Just don't forget to remove the temporary workspace.
There is one thing to mention though, assuming that we are hosting the application on only ONE server, so during the replacement, SPOF (Single Point of Failure) could happen, which means during the deployment, there is chance that the application can not be access. While in real business, we usually have multiple servers and there are solutions such as Graceful Shutdown and Smooth Release, which can help to reduce the risk of this kind of failure.
Cool, guess we are finally here. We've implemented a fully automatical deployment pipeline demo. Actually there are many items on our todo-list, such as authentication, code lint, configurable pre/post-deployment scripts, Docker integration we've mentioned, and you can even add a manual approval feature to turn your continuous deployment into continuous delivery. Hope you have fun with it.